Project 1B
Encrypted Network Communication
INTRODUCTION:
In this project, you will build a multi-process telnet-like client and
server. This project is a continuation of Project 1A. It can be broken
up into two major steps:
- Passing input and output over a TCP socket
- Encrypting communication
RELATION TO READING AND LECTURES:
This lab will build on the process and exception discussions,
but it is really about researching and exploiting APIs.
PROJECT OBJECTIVES:
- Demonstrate the ability to research new APIs and debug code that exploits them
- Demonstrate ability to do basic network communication
- Demonstrate ability to do basic encryption
- Develop multi-process debugging skills
DELIVERABLES:
A single tarball (.tar.gz) containing:
- C source modules that compile cleanly (with no errors or warnings).
You will have (at lesat) two source files:
lab1b-client.c and lab1b-server.c,
which should compile to the executables
lab1b-client and lab1b-server,
respectively.
- a Makefile to build the program and the tarball.
It should have distinct targets for the client and
server, but it should also have a default target
that builds both.
It should also have the (now) traditional clean and dist
targets.
- a my.key file, containing the encryption key to be used
in the second part of this project.
- a README file describing the contents of the tarball and
anything interesting you would like to bring to our attention
(e.g. research, limitations, features, testing methodology, use of slip days).
PROJECT DESCRIPTION:
Study the following man pages:
- mcrypt(3) ...a data encryption library (aka libmcrypt)
- socket(7) ...for creating communication endpoints (networking)
Passing input and output over a TCP socket
Using Project 1A's --shell option as a starting point,
create a client program (lab1b-client) and a server program (lab1b-server),
both of which support a mandatory
--port=port# switch. (Note: you can remove the --shell option)
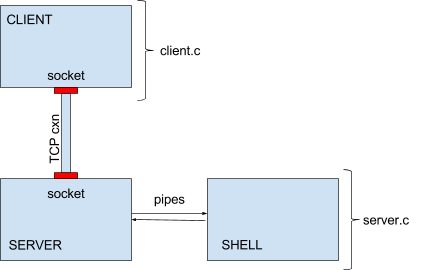
Your overall program design will look like the diagram above.
You will have a client process, a server process, and a shell process.
The first two are connected via TCP connection, and the last two are connected via pipes.
The client program
- The client program will open a connection to a server
(port specified with the mandatory --port=
command line parameter) rather than sending it directly
to a shell.
The client should then send input from the
keyboard to the socket (while echoing to the display), and input from
the socket to the display.
- Maintain the same non-canonical (character at a time, no echo)
terminal behavior you used in Project 1A.
- Include, in the client, a --log=filename option,
which maintains a record of data sent over the socket (see below).
- If a ^D is entered on the terminal, simply pass it through to
the server like any other character.
- if a ^C is entered on the terminal, simply pass it through to the
server like any other character.
- In the second part of this project we will add an
--encrypt=filename flag to the client.
- If the client encounters an unrecognized argument it should print
an informative usage message (on stderr) and exit with a return code of 1.
If any system call fails, it should print an informative
error message (on stderr) and exit with a return code of 1.
- Before exiting, restore normal terminal modes.
For all of this testing, the client and server will be running on the same host
(localhost), but if you would like to add a --host=name
parameter you should be able to access a shell session from other computers.
The server program
- The server program will connect with the client, receive the client's
commands and send them to the shell, and will "serve" the client the
outputs of those commands.
- The server program will listen on a network socket (port specified with
the mandatory --port= command line parameter.
- accept a connection when it is made
- once a connection is made, fork a child process,
which will exec a shell to process commands received;
the server process should communicate with the shell via pipes
(as you did in Project 1A).
- redirect the shell process's stdin/stdout/stderr to the appropriate pipe ends
(similar to what you did in Project 1A).
- input received through the network socket should be forwarded
through the pipe to the shell.
Because the server forks the shell (and knows its process ID),
the processing of ^C (turning it into a SIGINT
to the shell) must be done in the server.
Similarly, when the server encounters a ^D it should
close the write side of the pipe to the shell
(as was done in project 1A).
- input received from the shell pipes (which receive both stdout
and stderr from the shell) should be forwarded out to the
network socket.
- If the server gets an EOF or SIGPIPE from the shell pipes
(e.g., the shell exits), harvest the shell's completion status,
log it to stderr (as you did in project 1A), and exit with a return code of 0.
- If the server gets an EOF or read error from the network connection,
(e.g. the client exits), close the write pipe to the shell,
await an EOF from the pipe from the shell, and harvest and report
its termination status (as above).
- If the server encounters an unrecognized argument it should print
an informative usage message (on stderr) and exit with return code of 1.
If any system call fails, it should print an informative
error message (on stderr) and exit with an return code of 1.
- In the second part of this project we will add a
--encrypt=filename flag to the server.
To send commands to the shell, you will need to start both the client and
the server. On the client side, the behavior should be very similar to
that of Project 1A, in that you will see your commands echoed back to
the terminal as well as the output from the shell. Do not display
anything (other than error messages) on the server side.
If you are not familiar with socket programming, you may find this
tutorial
to be useful.
Choose a random port number (greater than 1024) for your testing.
Port numbers below 1024 are reserved.
Be advised that listens may remain active for several seconds after the server exits;
This means that you may get occasional socket-in-use errors if you the server before
the old listen is taken down.
Because the server is started independently from the client, it will have its own
stderr and stdout which go the terminal session from which it was started. If you
want to implement debug output from the server, you can send it to the server's
stdout (file descriptor 1).
Shut-down Order
If the client initiates the closing of the socket, it may not receive the last output from the shell.
To ensure that no output is lost, shut-downs should be initiated from the server side:
- an exit(1) command is sent to the shell, or the server closes the write pipe to the shell.
- the shell exits, causing the server to receive an EOF on the read pipe from the shell.
- the server collects and reports the shell's termination status.
- the server closes the network socket to the client, and exits.
- the client continues to process output from the server until itreceives an error on the network socket from the server.
- the client restores terminal modes and exits.
After reporting the shell's termination status and closing the network socket, the server should exit.
Otherwise it would tie up the socket and prevent testing new server versions. After your test is complete,
the client, server, and shell should all be gone. There should be no remaining orphan processes.
The --log option
To ensure that encryption is being correctly done, we will ask you to add a
--log=filename option to your client. If this
option is specified, all data written to or read from the server should be logged
to the specified file.
Prefix each log entry with
SENT # bytes:
or
RECEIVED # bytes:
as appropriate. (Note the colon and space between the word bytes
and the start of the data).
Each of these lines should be followed by a newline character (even if the last character
of the reported string was a newline).
Sample log format output:
SENT 35 bytes: sendingsendingsendingsendingsending
RECEIVED 18 bytes: receivingreceiving
Encrypted communication
- you may need to install the libmcrypt-dev package to
get the encryption library and its documentation.
- add a --encrypt=keyfile
command line option to
your client and server which, if included, will turn on encryption
(of all traffic in both directions) and provide the key.
- Choose an encryption algorithm from Linux libmcrypt.
Then modify both the client and server applications to encrypt
traffic before sending it over the network and decrypt it after
receiving it.
- Do encryption based on a key, taken from the file whose name
is specified with the --encrypt= option.
Create a key file and include it with your submission.
We will test your program with your key, and others we create.
- Using your key and encryption algorithm, run a session and use the
--log option to verify that encryption
and decryption are working properly. The --log
option should record outgoing data post-encryption and incoming data
pre-decryption.
- Do not include your --log files with your
submission; we will generate our own from your program.
NOTE: these are block encryption algorithms that we want to
apply to data streams. You probably want to select the
"cfb" (8-bit Cypher-Feedback Mode). For stream
encryption/decryption to work, each process will need to
use a separate encryption session (a separate call to
mcrypt_module_open) for input and output
(two sessions per process).
This is necessary because, in cypher feedback mode, the
encryption or decryption of any character is affected
by the characters that preceeded it. If two different
interspersed streams use the same encryption session,
any difference in processing order will render decryption
impossible.
NOTE: You must use the same key and initialization vector for
both the client and the server. This means that you should
set the initialization vector to constant values (rather than
the random values you will find in many examples). We will
talk about ways to securely negotiate such seeds when we
get into secure communications (and SSL).
SUBMISSION:
Your README file must include lines of the form:
NAME: your name
EMAIL: your email
ID: your student ID
Your name, student ID, and email address should also appear as comments at the top
of your Makefile and each source file.
Your tarball should have a name of the form lab1b-studentID.tar.gz.
You can sanity check your submission with this
test script.
We will test it on a departmental Linux server.
You would be well advised to test your submission on that platform before submitting it.
GRADING:
Points for this project will be awarded:
| value | feature |
| Packaging and build (15% total) |
| 5% | un-tars expected contents |
| 5% | clean build of correct programs w/default action (no warnings) |
| 3% | Makefile has working clean and dist targets |
| 2% | reasonableness of README contents |
|
| Communication (50% total) |
| 5% | input properly echos (character at a time) from client |
| 10% | client passes (character at a time) data between server and termimal
(with proper CR->NL mapping) |
| 10% | server passes (character at a time) data between client and shell
(with proper NL->CRLF mapping) |
| 5% | ^D from client closes connection, restores terminal modes, exits RC=0 |
| 5% | ^C from client sends a SIGINT to shell |
| 5% | server properly logs shell termination status |
| 5% | --log= option properly reports sent data |
| 5% | --log option properly reports received data |
|
| Encryption (25% total) |
| 5% | --encrypt option obtains and uses key file for encrypted communication |
| 5% | data is encrypted before sending (tested with --log option) |
| 5% | data is decrypted after receiving (tested with --log option) |
| 5% | encrypted commands sent to shell are properly decrypted before execution |
| 5% | encrypted outupt sent by shell are properly decrypted before display |
|
| Code Review (10%) |
| 10% | correct library use |