|
Due date: Friday, February 13, 2015, 11:00 PM |
Submission deadline: Programming work is submitted electronically and must be submitted by Friday at 11:00 PM. However, we recognize that there might be last minute difficulty during submission process, so as long as you started your sumission process before 11:00PM, you have until 11:55PM to completely upload your submission. After 11:55PM, you will have to use grace period as follows.
Late Policy: Programming work submitted after the deadline but less than 24 hours late (i.e., by Saturday 11:00 PM) will be accepted but penalized 25%, and programming work submitted more than 24 hours but less than 48 hours late (i.e., by Sunday 11:00 PM) will be penalized 50%. No programming work will be accepted more than 48 hours late. Since emergencies do arise, each student is allowed a total of four unpenalized late days (four periods up to 24 hours each) for programming work, but no single assignment may be more than two days late.
Honor Code reminder: For more detailed discussion of the Honor Code as it pertains to CS144, please see the Assigned Work page under Honor Code. In summary: You must indicate on all of your submitted work any assistance (human or otherwise) that you received. Any assistance received that is not given proper citation will be considered a violation of the Honor Code. In any event, you are responsible for understanding and being able to explain on your own all material that you submit.
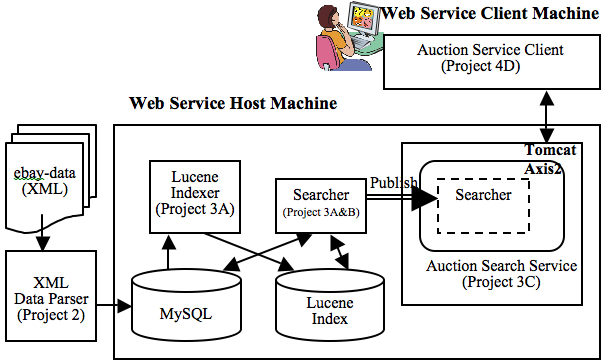
In Part 2 of the project, you designed a relational schema for a snapshot of eBay auction data provided in a set of XML files. In this part you will provide "search" functions to this data. Your search functions will support two types of queries: keyword-based search over text fields (such as item descriptions) and search for items located within a geographic region. For the first type of queries, you will be using the Apache Lucene text search engine. For the second type, you will use a spatial index in MySQL. Once you finish implementing the search functions in Java, you will "publish" these Java search functions as Web services using the Axis2 library and Tomcat.
Here is the overview architecture of the system once you complete this part of the project
By completing this project you will be able to learn:
In Part A, you need to implement the following basic keyword search functionality over eBay data.
For example, for the query "Disney", your basic search function should return the itemId and name of items that have the keyword "Disney" in the union of the name, category or description attributes. Also, for multiple word queries, such as "star trek", you should consider that as "star" OR "trek". That is, you should return any item if it has either "star" or "trek" in the union of the keywords in the name, category and description attributes.
To support the basic search function, you will have to build an inverted index capable of searching over the union of the three attributes in your database schema, using an open-source library called Lucene.
In order to access MySQL data from a Java program, you will need to use JDBC (Java DataBase Connectivity) API. You will also use Lucene to build inverted indexes for text fields and search over them. To learn how to use JDBC and Lucene, first go over the following two tutorials.
Also, if you haven't gone over our short tutorial on Ant in Project 2, please do it now because we heavily rely on Ant for this part of the project. Proceed to the next step only after you have gone over the above tutorials.In order to support the basic keyword search function described before, you
will first need to create a Lucene index on a number of
attributes of your database tables. Decide which index(es) to
create on which attribute(s).
Document your design
choices and briefly discuss why you've chosen to create your
particular index(es) in a plaintext file
called README.txt.
Once you have chosen what Lucene index(es) to create, write a Java application to create them, iterating through your database tables to add the appropriate index entries to the index(es). As a starting point, we have provided skeleton code DbManager.java and Indexer.java in the src directory of project3-indexer.zip.
Note that the two Java classes are defined as part of the edu.ucla.cs.cs144 package, so the java files are located at src/edu/ucla/cs/cs144 to be precise. If you are not clear about how a package name is related to the source directory, read Section 1.8 of A Crash Course from C++ to Java again. As part of your implementation, you will probably want to create new Java classes for modular development. If you do, make sure that your new classes become part of edu.ucla.cs.cs144 package and place your source files in the src/edu/ucla/cs/cs144. directory.
The provided DbManager class encapsulates the database connection information for JDBC, so that the information is separate from your main code. For any reason, if you decide not to use this class, make sure to use the database CS144 and connect it as the user "cs144" with empty password. The Indexer class contains the bare minimum code for your Lucene index creation module. Inside this class, you will have to use JDBC to retrieve Item information from MySQL and use Lucene IndexWriter class to create Lucene indexes. Again, if you are not familiar with how to use JDBC and Lucene API, read JDBC tutorial, and Lucene tutorial.
When you create your Lucene index(es), make sure to create them under /var/lib/lucene/ directory. For example, if you want to create your (first) Lucene index in the index1 subdirectory, it should be created at /var/lib/lucene/index1/.
The project3-indexer.zip file contains ant build.xml file, which has the target "compile" to compile your Java source code and the target "run" to invoke edu.ucla.cs.cs144.Indexer for indexing. If needed, update your build.xml, so that the Ant target "run" always executes your Lucene indexing module and builds the index(es).
Notes on MySQL and Lucene library files: As we explained in the JDBC and Lucene tutorials, if you want to use MySQL JDBC and Lucene libraries in your code, you need to pass the location of the two jar files (mysql-connector-java.jar and lucene-*.jar in /usr/share/java) through the classpath option of javac and java. Otherwise you are likely to get "class not found" error. Since the provided build.xml file sets the classpath option automatically, you are unlikely to encounter this problem for this project as long as you use our build.xml file.
Now that you have created a (set of) Lucene index(es),
you will implement the basic search functionality. In particular,
you will need to implement the basicSearch function
of the following Java interface (spatialSearch and getXMLDataForItemId functions will be implemented later in Part B):
public interface IAuctionSearch {
public SearchResult[] basicSearch(String query, int numResultsToSkip, int numResultsToReturn);
public SearchResult[] spatialSearch(String query, SearchRegion region, int numResultsToSkip, int numResultsToReturn);
public String getXMLDataForItemId(String itemId);
public String echo(String message);
}
You'll find this interface definition in the
IAuctionSearch.java file located in the src/edu/ucla/cs/cs144 directory of project3-searcher.zip.
Roughly, given a query, basicSearch() should
return numResultsToReturn items after skipping the top numResultsToSkip matching items. For example, if numResultsToSkip = 10 and numResultsToReturn = 20, the functions should return top-11 through top-30 matching auction items as the result.
Read IAuctionSearch.java
to understand what each method should do, which is desribed as a comment within the file. The SearchResult.java file has the definition for the SearchResult class, which is used by the basicSearch method to return search results. It has two attribues, itemId and name, that are the id and the name of a returned eBay item.
The sample code AuctionSearch.java in the
same directory of the zip file has
the echo() method implemented for you. You will have to add your code to the parts marked as "TODO: Your code here!". To identify the items the contain the query keywords, your implementation of basicSearch() method must use Lucene index(es) that you built in Part A.2, which is located below /var/lib/lucene/. The search should be performed over the union of the item name, category, and description attributes and your method should return (id, name) pairs of matching items.
Note: You may use any ranking method for ordering the results from basicSearch. Lucene's default ranking may be a good choice, for example.
Java String comparison: To compare Strings in Java, you must use the equals method, because the operator == in Java compares object references not the object values.
To help you debug your basicSearch() methods, we provide some sample queries and the number of matching items.
Note: In order to get the above results, you have to assign datatype varchar(4000) to the Description field, as we suggested in Project 2.
IAuctionSearch interface: spatialSearch() and getXMLDataForItemId().
public interface IAuctionSearch {
public SearchResult[] basicSearch(String query, int numResultsToSkip, int numResultsToReturn);
public SearchResult[] spatialSearch(String query, SearchRegion region, int numResultsToSkip, int numResultsToReturn);
public String getXMLDataForItemId(String itemId);
public String echo(String message);
}
spatialSearch() method is an extension of the basicSearch() method and it returns items if they satisfy both of the following two conditions:
basicSearch()) and
getXMLDataForItemId() method later.
You can use the Lucene index(es) that you built earlier to check the keyword-matching condition of spatialSearch(). To check the spatial condition, it is possible build two separate B+tree indexes on latitude and longitude attributes and look up both indexes using the specified region. This approach is likely to be better than a full scan of the entire table(s), but a better approach is to build a spatial index that indexes on both attributes simultaneously and intelligently divides the two dimensional space, so that items within a given region can be identified much more efficiently with a single index lookup.
In MySQL, it is possible to create a spatial index (in particular, R-tree index) on geometric (or spatial) attributes for efficient spatial-query support. Go over MySQL manual pages on Using Spatial Data. Pay particular attention to the section on Creating Spatial Indexes and Using Spatial Indexes to learn how to create and use a spatial index in MySQL.
Now that you have learned how to use a spatial index in MySQL, it is time to create one. Note that in MySQL 5.5, a spatial index can be built only for MyISAM tables only, so we will first need to create a table that contains information on items' latitude and longitude using the MyISAM storage engine. In particular, the table should contain (itemId, latitude, longitude) of each item, where (latitude, longitude) is stored as a single column of POINT type so that a spatial index can be created on the column.
Write an SQL script that (1) creates such a table using MyISAM storage engine, (2) populate the table with itemId, latitude, and longitude information, and (3) create a spatial index on latitude and longitude. You can use POINT() function in MySQL to convert a pair of numeric values to a POINT. Name the
SQL script as buildSQLIndex.sql. Run this script once, to create the table and the spatial index.
Write another SQL script containing the DROP TABLE
and DROP INDEX statements
that delete the tables and indexes for spatial query support.
Name this script as dropSQLIndex.sql. (You MUST NOT run this
script! You will need the spatial index for the next step.)
Note: Remember that MySQL automatically creates an index on the primary key of each table, so you will not have to create an index on the primary key of any table.
spatialSearch MethodNow implement the spatialSearch() method in
the AunctionSearch.java file. Your implementation of spatialSearch() must use Lucene index(es) to handle the keyword constraint and MySQL spatial index for spatial constraint. If you followed our instruction in Part A, your Lucene index(es) must be located below /var/lib/lucene/.
For querying and retrieving data from MySQL, make sure that your code uses the database CS144 and connect it as the user "cs144" with empty password.
Note: You may use any ranking method for ordering the results from spatialSearch.
getXMLDataFromItemId MethodThe third getXMLDataForItemId() method of IAuctionSearch should return the XML-formatted item data as string given its itemID. Make sure that the output from getXMLDataForItemId() conforms to the DTD of the original eBay XML data, except that the root element should now be <ITEM>, not <ITEMS> (note that this method returns only one eBay item, not multiple items). Also make sure that the format of each XML element is as close to the original XML data as possible, particularly if the SQL data type is TIMESTAMP. You will have to escape the character "<" to "<" and ">" to ">", and so on (Reference) if they are not part of an XML tag. Finally, if there is no matching Item for a given itemId, return an empty string.
Note: You can use the Java class SimpleDateFormat to parse and format date strings.
We have included a simple test file AuctionSearchTest.java in project3-searcher.zip. You can use the ant target "run" to invoke this AuctionSearchTest class for basic testing of your code. Before you move on to the next step, add more test cases to AuctionSearchTest, thoroughly test your code, and make sure that your implementation is correct.
Now that you have finished your implementation of the AuctionSearch class, you need to publish it as a Web service at the URL http://localhost:1448/axis2/services/AuctionSearchService. This will help other applications search and access your eBay data remotely over the Internet. Apache Tomcat server with Axis2 makes the publication of an existing Java class as a Web service extremely simple.
Apache Tomcat is a Java Servlet container and web server. A web server dishes out web pages in response to requests from a user sitting at a web browser. But web servers are not limited to serving up static HTML pages; they can also run programs in response to user requests and return the dynamic results to the user's browser. In particular, Tomcat supports both Java servlet and JavaServerPages (JSP) technologies to serve dynamic contents. Read the Apache Tomcat access instruction to learn how to access a few pages from the preinstalled Tomcat server from your host.
Axis2 is a Java package that can be installed within a Tomcat server to help the server handle Web-service requests. Once installed, Axis2 (1) monitors the HTTP requests to your Tomcat server to detect any Web Service request (2) invokes the appropriate Java method corresponding to the request and passes along the parameters in the request and (3) sends back the return value from the Java method to the remote client. Therefore, when you use Apache Tomcat together with Axis2, you do not need to do much to publish your Java class as a Web service! Even better, for all Web serivces published through Axis2, Axis2 automatically generates their WSDL (Web-Service Description Language) definitions, which describes the name, URL, and the parameters of your published Java methods. Follow the Axis2 installation guide to install the Axis2 package to your Tomcat server. Once successfully installed, all HTTP requests with the URL prefix http://localhost:1448/axis2/services will be interpreted as a Web service request and will be handled by Axis2.
In order to publish your Java classes as a Web service, you need to "package" them as a service archive file. Before you proceed to the next step, read
to learn how you can create a service archive file from your class file(s).Now that you understand how to publish a Java class as a Web service, you need to package your classes as a service archive file (AAR file). Your Web service needs to be published at http://localhost:1448/axis2/services/AuctionSearchService, so you will have to prepare your service archive file in compliance with this address. The WSDL of your service must also be available at http://localhost:1448/axis2/services/AuctionSearchService?wsdl, but since you are using Axis2, it generates this WSDL automatically for you.
The Ant build.xml file included in project3-searcher.zip has the target "build" that does the basic packaging of your Java classes and create the service archive file at build/AuctionSearchService.aar. Go over the "build" target in the build.xml file to understand how it does it. Note that all the files in WebContents directory are automatically added to the AAR file, including WebContents/META-INF/services.xml. Read the services.xml file to see the mapping between Web service requests and the AuctionSearch class. If necessary, modify build.xml to make it suitable for your code. Even after your modification, the AAR file should still be generated at build/AuctionSearchService.aar.
Finally, remember that if you use external libraries that
are not part of the standard Java libraries, you have to make
sure that the external libraries are available when your class(es) are deployed
to Tomcat. Even if your classes compile and run fine
under your development environment, it may not run
properly within a Tomcat server if
your external library files are not available in
Tomcat. To avoid this problem
make sure you include all external library files that you use in the lib subdirectory of your AuctionSearchService.aar.
If you use any third-party library that was not preinstalled on our VM,
make sure to place library files in the lib subdirectory of your current working directory. The provided build.xml file copies every jar
file in lib directory to the aar file.
Now we are ready to deploy your Web service. Simply drop your service archive file prepared in the previous step to $CATALINA_BASE/webapps/axis2/WEB-INF/services. If this directory does not exist yet, create it first and copy your archive file. Tomcat supports hotdeployment (adding new services without restarting) and hotupdate (updating existing services without restarting). Read about their pros/cons and then enable them as you see fit. They can help speed up development, but don't always work as you'd expect. When in doubt, restart Tomcat by running the command "sudo /etc/init.d/tomcat7 restart".
When your Java class is deployed as a Web service, its "working directory" is likely to be different from when you run your class a "standalone application" --- the working directory of any Tomcat process is often (but not always) $CATALINA_HOME/bin. If you get unexpected errors like "File Not Found" or "Segment Not Found" after deployment, the difference in the working directory may be the cause of the error. Check your code to see whether you made any implicit assumption on the current working directory.
Test your Web service deployment and make sure it works correctly. The basicSearch, getXMLDataForItemId, and echo methods require only simple input, and are thus easily accessible through a REST-style interface for some basic testing. For example accesing the URL http://localhost:1448/axis2/services/AuctionSearchService/echo?message=helloThere should return an XML response from your Java method echo. More thorough testing of your Web service will be done in the next step.
Notes on the namespace of the published service: When you publish an existing Java class as a Web service using Axis2 v1.6 (the version on the VM), the package name of your class becomes the namespace of the service by default. That is, the package name "edu.ucla.cs.cs144" of AuctionSearch implies that the namespace of the AuctionSearchService will be "http://cs144.cs.ucla.edu". The mapping of the package name to the service namespace varies slightly among different versions of Axis2, so make sure that you use the version on our VM. Do not change the default namespace by overriding it in your services.xml file. Otherwise, you will get errors in the next step.
In general, to test the functions of a SOAP Web service, you will have to implement a SOAP client that can access your service. Axis2 not only helps you publish your Java classes as a Web service, but also provides the tools to generate the basic Web-service client code ("Web service client stub") automatically from a WSDL description of a service. (e.g., you can use wsdl2java.sh in $AXIS2_HOME/bin for this purpose.)
While you can use this tool to generate the client code of your service, the output is a bit too complex and ugly to read (like most autogenerated codes are), so we are providing a "cleaned-up" version of the client code as AuctionSearchClient.java in project3-client.zip. By calling the methods of the AuctionSearchClient class, your testing code can access the "remote" Web-service functions like any other local public static method. We have also included a simple test code in AuctionSearchTest.java. You can invoke the test class with the ant target "run" of the included build.xml. Add more test cases to AuctionSearchTest to test all four Web service functions thoroughly.
Notes on CLASSPATH: The provided AuctionSearchClient.java depends on Axis2 Java library files that are not part of the standard Java Runtime environment. Again, since the standard Java compiler and runtime engine are NOT aware of Axis2 library files, they may generate "class not found" error when you try to compile and run the AuctionSearchClient. The included build.xml file in project3-client.zip tries to avoid this problem by passsing the location of Axis2 library files as the classpath parameter of java and javac.
For this project, you need to submit two zip files, one for index construction and another for search and Web service deployment.
The first zip file, project3-indexer.zip that has the following packaging structure.
project3-indexer.zip
 |
 +- buildSQLIndex.sql
 |
 +- dropSQLIndex.sql
 |
 +- build.xml
 |
 +- README.txt
 |
 +- src
 |   +- java source codes for indexer (with your own naming/structure)
 +- lib
     +- external java libraries used (that are not available on our VM)
Each file or directory is as following:
buildSQLIndex.sql and dropSQLIndex.sql that are used for creating and droping an spatial index within MySQL.
build.xml file, the ant script for Lucene index construction. Make sure that the target "run" of your build.xml executes your Indexer and creates all of your Lucene index(ex) below /var/lib/lucene/. Do not submit the binary version of your Indexer or your created Lucene index(es)
README.txt any comments you find worth noting, regarding your code structure, etc.cs144@cs144:~$ ./p3_index_test project3-indexer.zip(Add the appropriate path to the project3-indexer.zip if needed. You may need to use "chmod +x p3_index_test" if there is a permission error.) The script assumes that your CS144 database already contains the tables that you created and loaded in Project 2. If not, run your project 2 submission first before you test this submission.
You MUST test your submission using the script to minimize the chance of an unexpected error during grading. When evertything runs properly, you will see an output similar to the following from the script:
Dropping existing SQL index from dropSQLIndex.sql...
Creating SQL index from buildSQLIndex.sql...
Removing existing lucene index...
Running 'ant run' to create a lucene index...

  ... output from ant ...

Finished creating lucene index
This is the content of the lucene index directory:
  ... your index name(s) ...

Finished checking Project 3A submission
Please check the output of this script to ensure a proper submission
The second zip file, project3-searcher.zip should have the following packaging structure.
project3-searcher.zip
 |
 +- build.xml
 |
 +- README.txt
 |
 +- src
 |   +- java source codes for search (with your own naming/structure)
 +- lib
 |   +- external java libraries used (that are not available on our VM)
 +- WebContents
     +- META-INF
         +- services.xml
Each file or directory is as following:
build.xml file for the Web service deployment of your searcher class. Make sure
that the target "build" of your Ant script
builds your Web Service
into a single Axis2 archive file at
build/AuctionSearchService.aar.
Do not submit your compiled web service.README.txt any comments you find worth noting.services.xml file used for web service creation, inside WebContents/META-INF directoryMake sure that your scripts access other files (such as source codes, library dependencies, and resulting output files) properly with relative paths.
cs144@cs144:~$ ./p3_service_test project3-searcher.zip(Add the appropriate path to project3-searcher.zip if necessary. You may need to use "chmod +x p3_service_test" if there is a permission error.) In order to run the test script, you MUST have an internet connection since it downloads a file from the class Web site. The script assumes that your CS144 database has been populated with your tables and data from project 2 and your Lucene index has been created at /var/lib/lucene/ from project 3 part A. If not, run your project 2 and project 3 indexer submissions with their grading scripts before testing this submission.
You MUST test your submission using the script to minimize the chance of an unexpected error during grading. When evertything runs properly, you will see an output similar to the following from the grading script:
Running 'ant build-war' to build your AuctionSearch service...

   ... output from ant ...

Deploying your AuctionSearchService.aar...
Building AuctionSearch service client...

   ... output from ant ...

Running AuctionSearch service client...
Buildfile: build.xml

init:

build:
     [echo] project3-client: /tmp/p3c-grading/client/build.xml

run:
     [java] log4j:WARN No appenders could be found for logger (org.apache.axis2.util.Loader).
     [java] log4j:WARN Please initialize the log4j system properly.
     [java] Reply: Test message
     [java] Basic Seacrh Query: superman
     [java] Received 20 results
     [java] 1049430907: SUPERMAN WITH GEN 13 AND OTHER PRESTIGE BOOKS
     [java] 1045823269: Superman Doomsday Hunter Prey tpb
              ...more results...
     [java] Spatial Seacrh
     [java]   ...
     [java] XML data for ItemId: 1497595357
     [java] <Item ItemID="1497595357">
     [java]   <Name>PINK FLOYD~Syd Barretts First Trip~SEALED~dvd</Name>
     [java]   <Category>DVD</Category>
              ...more results...
     [java] </Item>

BUILD SUCCESSFUL
Total time: 9 seconds
Finished checking your Project 3 submission
Please check the output of this script to ensure a working submission
Finally, please create a submission archive project3.zip, containing the following items:
That is, we require you to submit your work for project 3 together with project 2 (again) via our submission page at CCLE.
You may resubmit as many times as you like, however only the latest submission will be saved, and those are what we will use for grading your work and determining late penalties.