JAVA TREEBUILDER |
TUTORIAL
|
| JTB
Home
Tutorial
Special Edition for GJ
Links:  |
IntroductionThis file is a basic guided tour to using JTB. We will run through the process of using JTB to generate the files needed to build a syntax tree. We'll also write a visitor to pretty print the contents of the syntax tree. The grammar we'll use for our example will be the Java1.1.jj grammar included with the JavaCC 0.6.1 distribution.You may want to take a look at the pretty printer example in the Examples
page. This tutorial is basically a run-through of that example.
We also recommend that you read the Documentation
page to familiarize yourself with the generated files.
PreliminariesBefore we start, you should know your grammar should be "bare-bones", i.e. it should not contain embedded Java code and all the productions should have a return type of void. As an example, see the Java 1.1 grammar. It is just a language grammar and contains no added functionality beyond simply parsing a Java file.Now to the tour. As mentioned above, the grammar file we'll be using is Java1.1.jj. This diagram illustrates the process of using JTB: 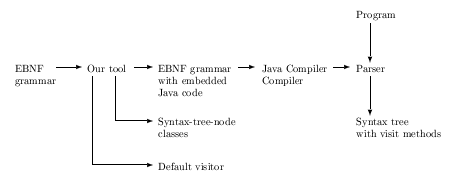 The first few steps are fairly obvious.
% jtb Java1.1.jj This will generate the syntaxtree directory which contains your tree node classes, the visitor directory which contains Visitor interface, DepthFirstVisitor class, ObjectVisitor interface and ObjectDepthFirst class, and jtb.out.jj, the grammar file with code inserted to build the syntax tree. Calling the Parser and VisitorsYour grammar will need a main() method to call the parser and visitors. The JavaCC examples usually place this method in the grammar file whereas I prefer to create a separate Main class in a different file. This allows you to make changes to main() without having to continuously reprocess the grammar file with JTB and JavaCC when you want to recompile it. A simple main() method could look like this:import syntaxtree.*;
import visitor.*;
public class Main {
public static void main(String args[]) {
JavaParser parser = new JavaParser(System.in);
try {
Node root = parser.CompilationUnit();
System.err.println("Java program parsed successfully.");
root.accept(new DepthFirstVisitor());
}
catch (ParseException e) {
System.err.println("Encountered errors during parse.");
}
}
}
Notice that we must import the syntaxtree and visitor
packages. We call parser.CompilationUnit() to start the
parsing of the input. JTB will alter this method to return a reference
to a CompilationUnit object (which implements Node).
We store this reference in the variable root. Next we call
the accept() method of the root Node, creating a new
DepthFirstVisitor object and passing it as an argument.
Since DepthFirstVisitor implements Visitor interface
and its methods by default visit each node of the tree, this program will
parse a Java program from standard input, build a tree during parsing,
and then visit each node in the tree.
The main() method in the actual pretty printer example is a
little more complex, but this is only so it can read input from files if
an argument is provided on the command line.
Programming a VisitorNow all we have left to do is write a visitor. Typcally, your visitors should go in the visitor directory and package. If you take a look at the automatically generated DepthFirstVisitor class, you'll notice it has handy comments above each method indicating which fields refer to which portions of the production. While writing the pretty printer I found the comments so handy, in fact, that I just copied the whole class over and replaced the name DepthFirstVisitor with PrettyPrinter and rewrote the methods that needed to be rewritten.However, if your visitor is small, maybe one or two methods, writing it from scratch works just as well. Remember that your visitor must implement the interface Visitor or ObjectVisitor directly or indirectly. As a simpler example of a visit method in the pretty printer, here is the method which prints out break statements: //
// f0 -> "break"
// f1 -> [ < IDENTIFIER > ]
// f2 -> ";"
//
public void visit(BreakStatement n) {
n.f0.accept(this);
if ( n.f1.present() )
n.f1.choice.accept(this);
n.f2.accept(this);
}
After the visitor has been completed, all that remains to be done is
to compile the code and run it! Again, you are encouraged to
take a good look at the source code of the pretty printer example
available for download.
|